The (wall of) Ubiquitous balloons, (in progress)
A balloon artwork running upon MQTT communication.
Description
I want to create numbers of balloon units that can breathe by themselves, became bigger and smaller slowly. Also could be controlled by a central controller.

Those units could be assembled as a wall (Right side of Fig.1), or could also be spread randomly on the floor(Fig.2).

MQTT and the Control System
Abstractly, there are two separate systems were used to control the balloon size. The first one is the MQTT, all the data running through the MQTT broker and sending to each unit to control the size.

The broker is running in the local network, on a Raspberry Pi 4B. This previous post had a document on how to set up the MQTT broker on a Pi.
The control interface is designed to allow running on the local network or public network. Depend on the MQTT broker if is broadcast to the public network.
MQTT broker setting
I create some MQTT users for each balloon unit. And they have limited access to reading and writing topics to the broker.

- All users could read and write the topic under their own user name in
balloonwall. And limit access to other topics. tmptest, esp32are two users for testing the system.

Design for Unit
The whole unit design is way harder than I thought. There are serval components in the units:
- 1 × Air Pump
- 1 ×Air Pressure Sensor MPX5010GP
- 2 × Solenoid valves
- 2 × Relay
- 1 × 12V DC Power Source
- 1 × DC Power Jack
- 1 × 7805 Regulator
- 1 × Y connector for pip
- 2 × 4mm connector
- 2 × LED (Red and Blue)
- 2-meter Soft Pip
- ESP32S
Because the whole project needs no less than 9 units, the cost of the single units should as less as possible. In an ideal budget, each unit should cost in 20USD (about 120 RMB)
In the current progress, I decide to use ESP32S as the unit’s microcontroller device, after compared to different MCU.
ESP32, EPS12, ESP8266, Arduino Nano 33 IoT
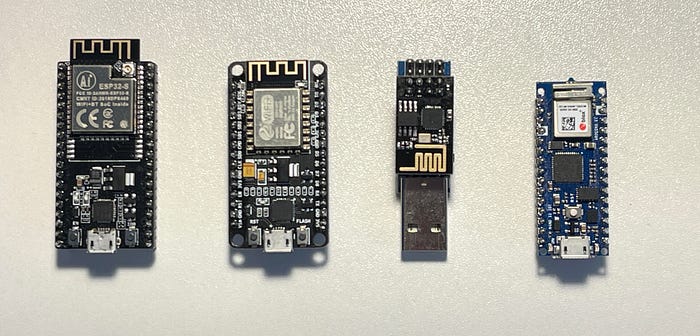
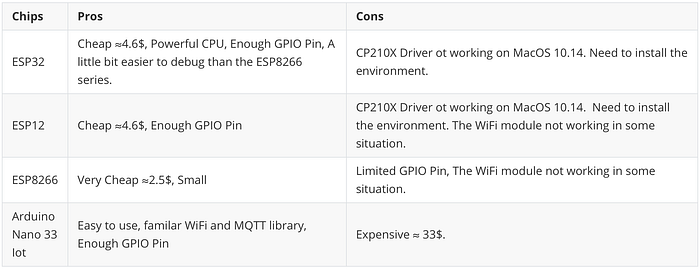
I spend so much time debugging the hardware problem. At first, I was trying to run the code on Nano 33 IoT, things are working great. Then when I testing the ESP8266 with the USB TTL board. It worked great sometimes, but sometimes it chokes the serial port then all my USB devices offline. And I realized the pin is so limited to control all the devices I need. Then I turn to ESP12, which also runs on an 8266 CPU. Then the nightmare came, its serial port does not show up in the Arduino IDE or Terminal on Mac. However, it shows up on PC and Mac running macOS 10.15 (Test on my friend's computer). After some research, I installed the CP210X USB driver for the development board. It finally shows up in the IDE and Terminal!!!!
But, the day after the installed day. It disappeared again… The final solution I had is running a MacOS 10.15 on an external hard disk and coding on that platform. ESP12 came up with a strange problem with WiFi connection. Sometimes connection complete is super fast and sometimes it fails to connect. So with the high recommendation from Jason Gao, I choose ESP32 as the unit microcontroller.
Diagram
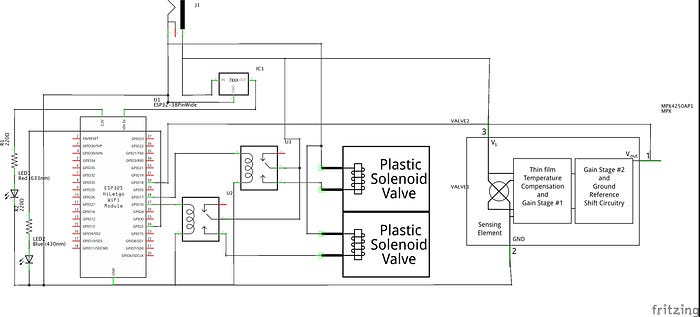
The unit uses 12V power supply. The Board feeds by 5V power coming from the regulator. Two solenoid valves control two ways of the air (in and out).
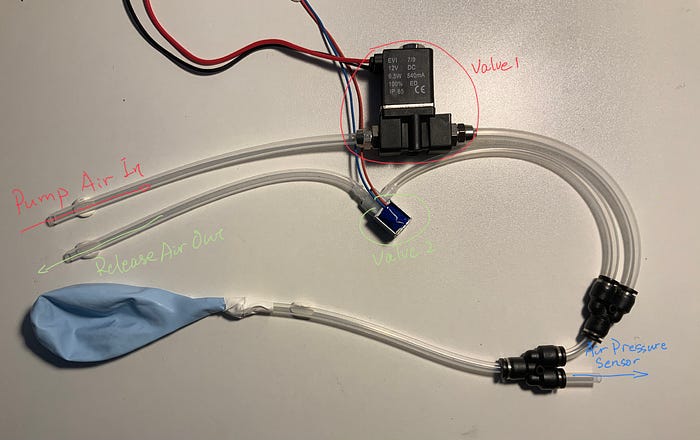
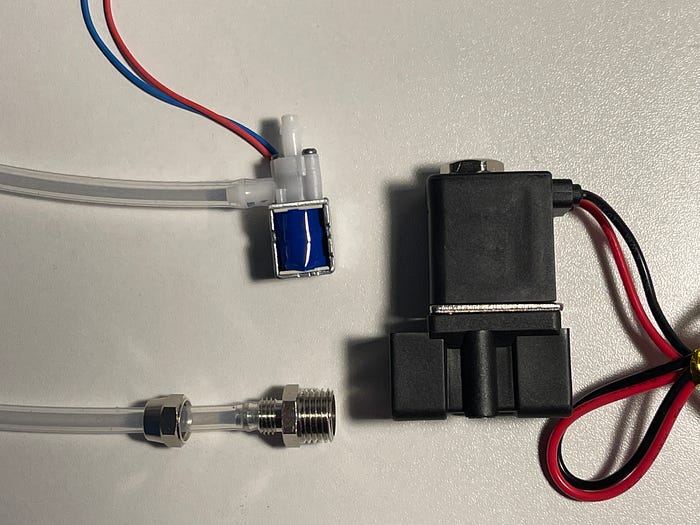
I use two types of solenoid valves for inlet air and out air. Valve1 uses for inlet air, it has a metal lock connect. The soft tube is more difficult to fall off due to the high air pressure of the air pump.
Some Test of the Air
Pump Test
Code and Test
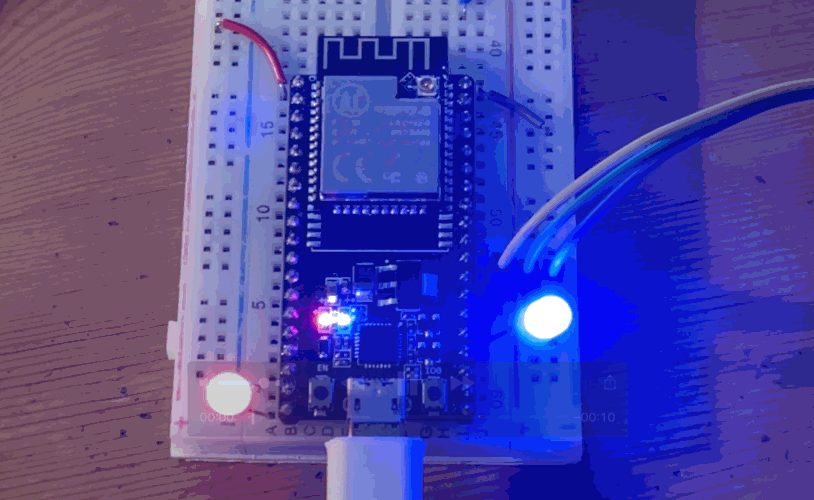
The blue LED will consistently blink after connecting to WiFi and before connected to the MQTT broker. Once the MQTT is connected, the blue LED will lit up permanently, only blink shortly when data is communicating.